
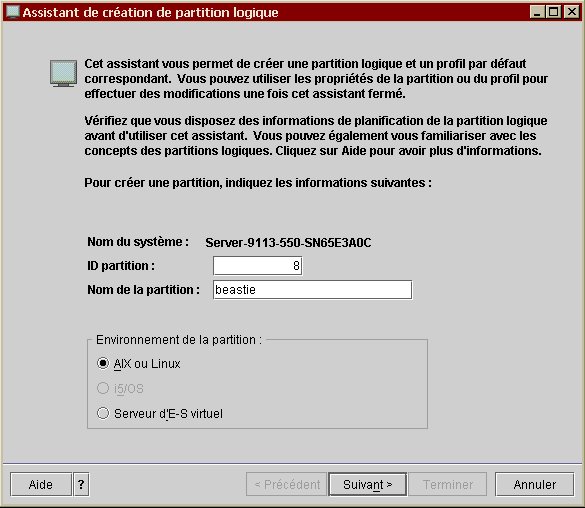
Build the DLPAR on the Hardware Management Console#
Log in to the HMC using the Java WSM (Web-based System Manager) client. Then, follow the illustrated guide:
- Set the logical name of the partition:
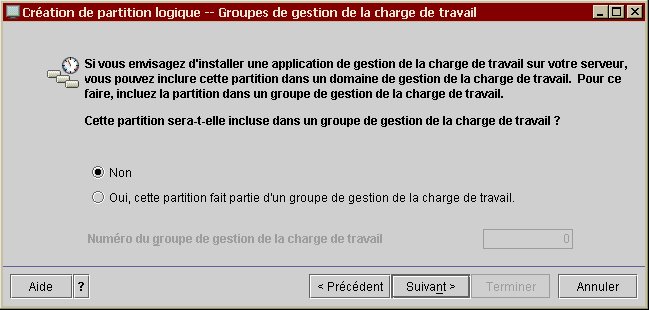
- Because a load manager is not needed, say so to the creation
wizard:
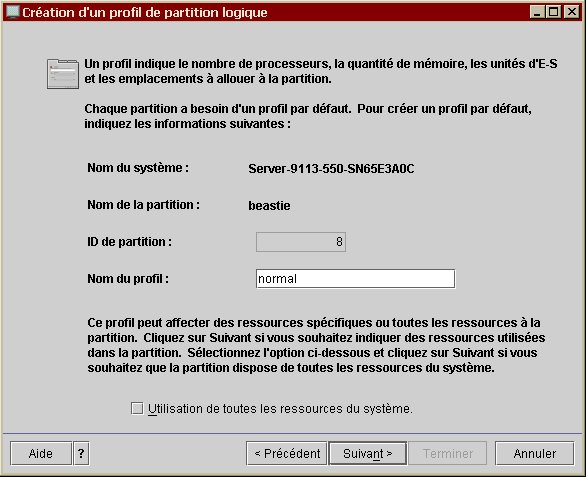
- Provide a name for the default profile:
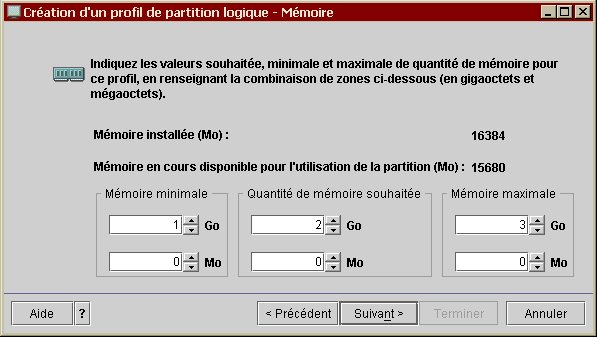
- Time to set the memory allocation sizes:
- Select the kind of logical partition, which is shared in this
case:
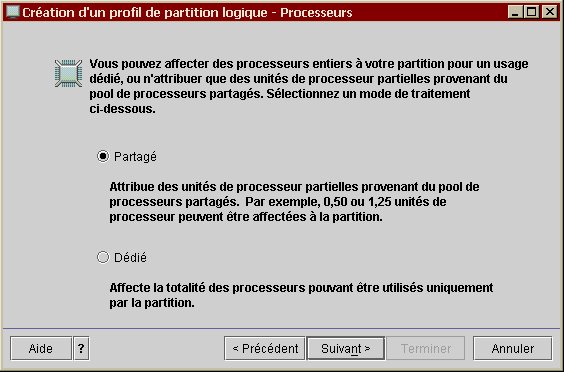
- Choose the desired entitlement capacity settings,…

… the shared mode and the use of virtual CPU (or not):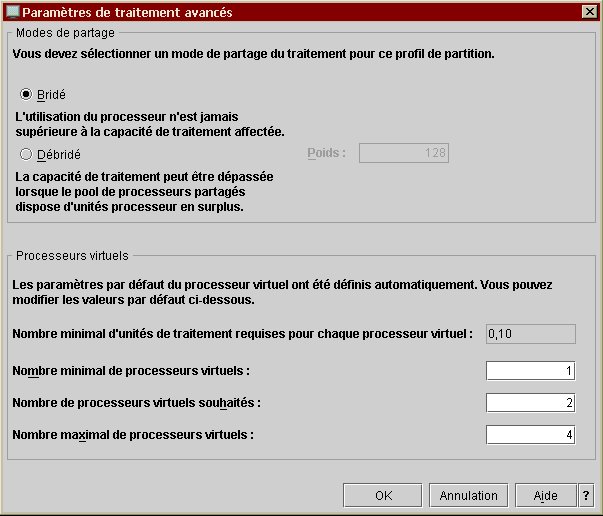
- Select the I/O unit(s) and its(their) attribution(s) from the
available hardware on the p550:

- Don’t choose I/O pools (its purpose is for Mainframe installation only).
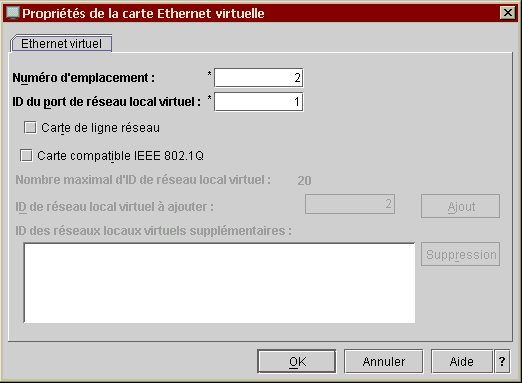
- Answer that virtual I/O cards are required and create two Ethernet
I/O modules on the two local virtual networks port’s ID, as for this
one:
Do the same thing for a SCSI I/O module, using the same port’s ID for the local and remote card (on the Virtual I/O Server):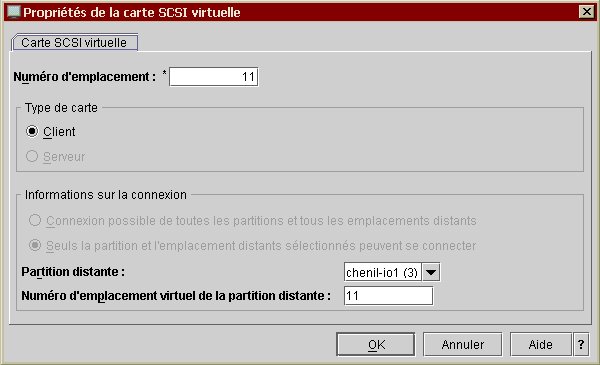
Be sure to set them to required since the virtual SCSI adapter will host the boot disk and update the number of virtual cards slots, if necessary: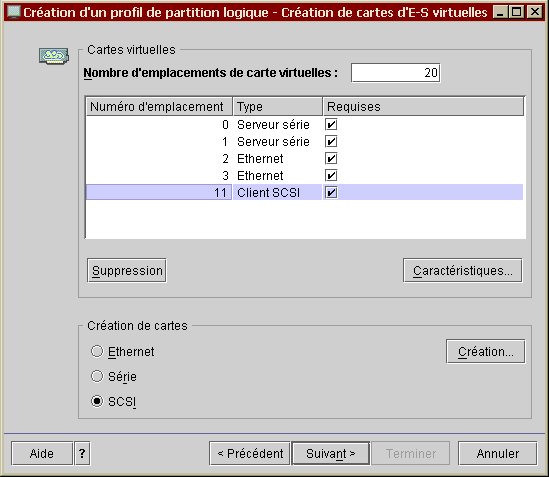
- The use of a power management partition is not needed here.
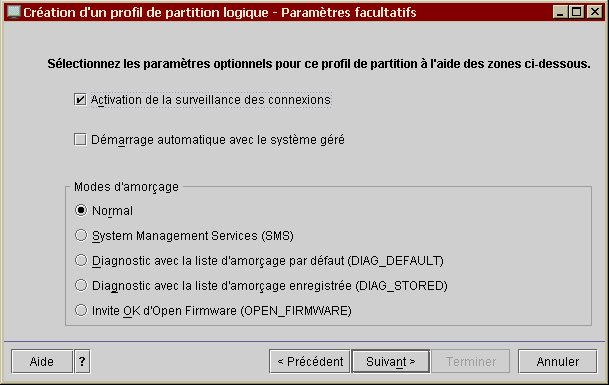
- Last, select the optional settings for the profil, e.g. activate the
surveillance of the connections:
**Important note:**Don’t forget to add a new virtual SCSI I/O module (of server type) on the VIOS in order to connect to the just created VIOC. If you made this modification dynamically on the running VIOS, please report the changes back to the corresponding profile or you will be in big trouble at the next VIOS reboot!
Manage and allocate the Virtual I/O Server resources#
The new DLPAR will use one sort of VIOS resource: storage device(s).
Case #1: reuse an already existing virtual adapter#
If we want to reuse the virtual adapter provided to the DLPAR, we need to clean things up a little. So, delete the corresponding virtual adapter and its virtual devices attached:
$ lsmap -vadapter vhost3
SVSA            Physloc                                      Client Partition ID
--------------- -------------------------------------------- ------------------
vhost3          U9113.550.65E3A0C-V3-C8                      0x00000006

VTD                   vhdbromonts00
LUN                   0x8100000000000000
Backing device        hdbromonts00
Physloc

VTD                   vhdbromonts01
LUN                   0x8200000000000000
Backing device        hdbromonts01
Physloc
$
$ rmdev -dev vhost3 -recursive
vhdbromonts00 deleted
vhdbromonts01 deleted
vhost3 deleted
Verify that the virtual adapter doesn’t exists anymore:
$ lsmap -vadapter vhost3
Device "vhost3" is not a Server Virtual SCSI Adapter (SVSA).
If necessary, remove the virtual devices: in this case the virtual devices are some logical volumes but they may be some real storage devices, as with SAN disks. For example:
# rmlv hdbromonts00
Warning, all data contained on logical volume hdbromonts00 will be destroyed.
rmlv: Do you wish to continue? y(es) n(o)? y
rmlv: Logical volume hdbromonts00 is removed.
#
# rmlv hdbromonts01
Warning, all data contained on logical volume hdbromonts01 will be destroyed.
rmlv: Do you wish to continue? y(es) n(o)? y
rmlv: Logical volume hdbromonts01 is removed.
Don’t forget to delete and recreate the corresponding virtual adapter on the VIOS via the HMC console, otherwise this will cause problem during the installation phase since the VIOS server will not properly give access to the underlying storage disk(s) or device(s)!
Recreate the device tree on the VIOS:
$ cfgdev
$
$ lsdev -virtual | grep vhost3
vhost3          Available  Virtual SCSI Server Adapter
Case #2: configure a newly created virtual adapter#
On the other side, if the virtual adapter is freshly created – as in the previous example – it is needed to inform the VIOS operating system about it:
$ cfgdev
$
$ lsdev -virtual | grep vhost6
vhost6          Available  Virtual SCSI Server Adapter
$
$ lsmap -vadapter vhost6
SVSA            Physloc                                      Client Partition ID
--------------- -------------------------------------------- ------------------
vhost6          U9113.550.65E3A0C-V3-C11                     0x00000000

VTD                   NO VIRTUAL TARGET DEVICE FOUND
Assuming we will use one local SCSI disk space to hold the OS and one SAN disk to host the application data, here are the required steps to configure the VIOS.
Create a logical volume for the OS and be sure to have an unused SAN disk:
$ mklv -lv beastielv rootvg 80
beastielv
$
$ lsdev | grep hdisk15
hdisk15    Available EMC Symmetrix FCP MPIO RaidS
Insert the wanted storage resources in the virtual adapter:
$  mkvdev -vdev beastielv -vadapter vhost6
vtscsi16 Available
$
$  mkvdev  -vdev hdisk15 -vadapter vhost6
vtscsi17 Available
$
$ lsmap -vadapter vhost6
SVSA            Physloc                                      Client Partition ID
--------------- -------------------------------------------- ------------------
vhost6          U9113.550.65E3A0C-V3-C11                     0x00000000

VTD                   vtscsi16
LUN                   0x8100000000000000
Backing device        beastielv
Physloc

VTD                   vtscsi17
LUN                   0x8200000000000000
Backing device        hdisk15
Physloc               U787B.001.DNW3897-P1-C4-T1-W5006048448930A41-L2000000000000
Create and configure the Network Install Manager#
Log in to the NIM server and set the standalone machine configuration
for beastie:
# TERM=vt220 smitty nim
/*
 * Perform NIM Administration Tasks
 *  Manage Machines
 *   Define a Machine
 *    Host Name of Machine                                    [beastie]
 * Perform NIM Software Installation and Maintenance Tasks
 *  Install and Update Software
 *   Install the Base Operating System on Standalone Clients
 *    (Choose: "beastie        machines       standalone")
 *    (Choose: "spot - Install a copy of a SPOT resource")
 *    (Chosse: "spot530     resources       spot")
 *    (Select: "LPP_SOURCE                                    [lpp_source530]")
 *    (Select: "ACCEPT new license agreements?                [yes]")
 *    (Select: "Initiate reboot and installation now?         [no]")
 *    (Select: "ACCEPT new license agreements?                [yes]")
 */
The only required prerequisite is to have a fully working name resolution.
Boot and automatically network install the DLPAR#
Start the DLPAR console via the HMC administration station: activate it and boot it using the SMS mode.
Then, simply configure the network stack of the Initial Program Load to be able to netboot the partition and remotely install it:
/*
 *  Steps:
 *   2.  Setup Remote IPL (Initial Program Load)
 *    2.   Interpartition Logical LAN      U9113.550.65E3A0C-V8-C3-T1  72ee80008003
 *     1.  IP Parameters
 *      1.  Client IP Address                    [10.126.213.196]
 *      2.  Server IP Address                    [10.126.213.193]
 *      3.  Gateway IP Address                   [000.000.000.000]
 *      4.  Subnet Mask                          [255.255.255.000]
 *     2.  Adapter Configuration
 *      2.  Spanning Tree Enabled
 *       2.  No  <===
 *     3.  Ping Test
 *      1.  Execute Ping Test
 *   5.  Select Boot Options
 *    1.  Select Install/Boot Device
 *     7.  List all Devices
 *      2.        -      Virtual Ethernet
 *                       ( loc=U9113.550.65E3A0C-V2-C3-T1 )
 *      2.  Normal Mode Boot
 *      1.  Yes
 */
Notes:
- 10.126.213.191 represents the IP address of the DLPAR
- 10.126.213.193 represents the IP address of the NIM server (
bootpandtftpservers)
Then select the default console device, the installation language (English) and follow the illustrated guide:
- In the proposed screen, choose to modify the default installation
settings…

- … in the optional choice…

- … and for additional software:
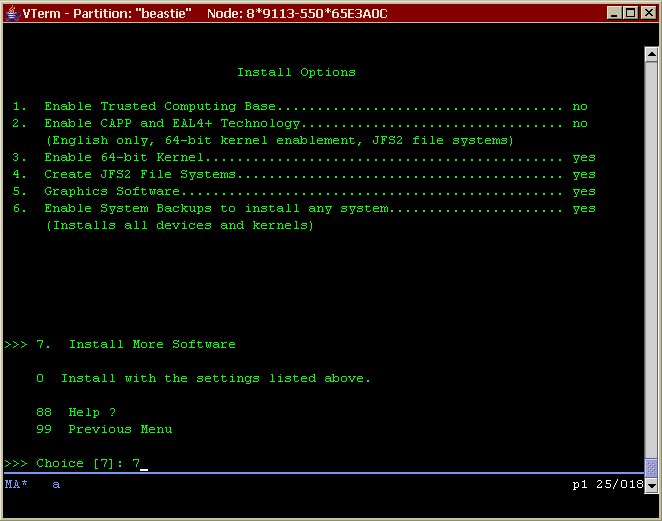
- Select the Server package:
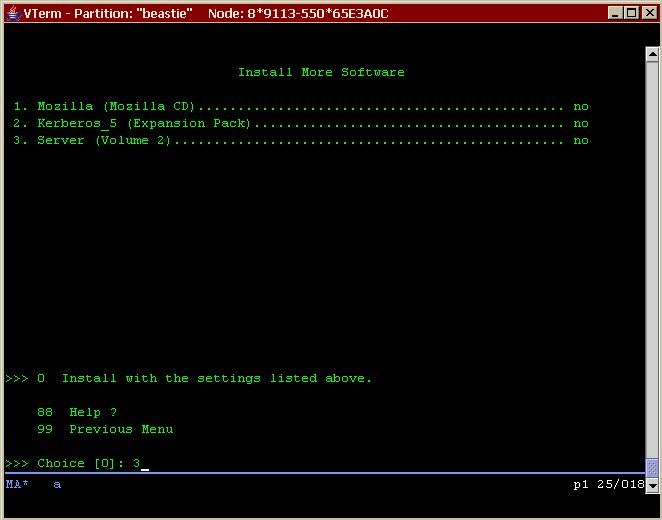
- Choose “Install with the settings listed above.”.
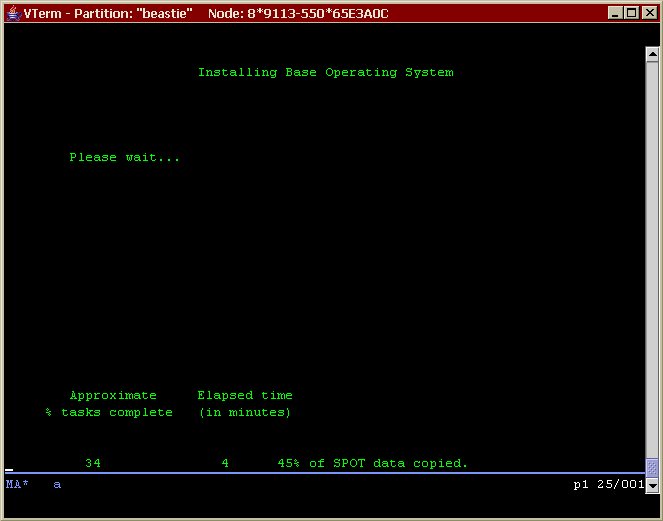
- Verify the overall selection…
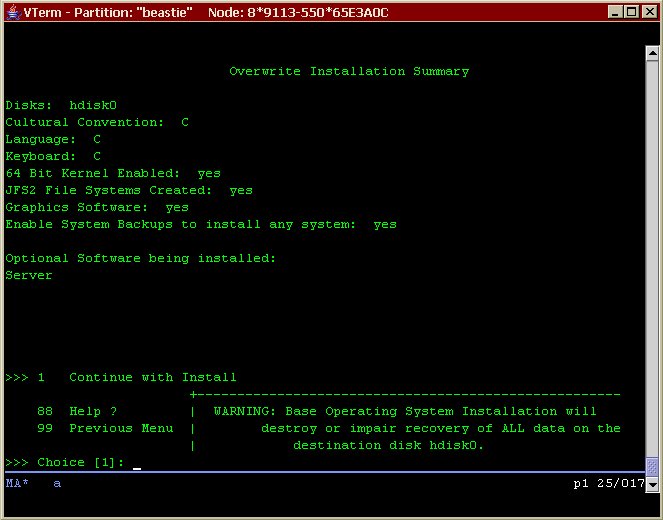
- … and happily wait for the installation to proceed:
Configuration steps on the DLPAR#
Well. The DLPAR beastie is now installed and basically configured but
lacks a lot of tools and none of the network infrastructure is currently
available from it (DNS, NIS, NFS, etc.).
Here is what can be done to render this machine (a little) more usable.
Internal IP address (high inter-partition bandwidth)#
As with the Inter-Domain Network (IDN) found on an E10K from Sun Microsystems, it may be interesting to use an internal LAN to communicate between LPARs using a high-bandwidth network. So, just pick up an unused IP address from the chosen private range and apply the settings to the correct network interface (e.g. configured with the right network ID):
# chdev -l en0 -a netaddr='193.168.10.5' -a netmask='255.255.255.0' -a state=up
Allocate data storage space#
Applications and users data are kept outside the OS space and reside in their own volume group. All the data are hosted on SAN disk as provided via the VIOS:
# lsdev | grep hdisk
hdisk0     Available       Virtual SCSI Disk Drive
hdisk1     Available       Virtual SCSI Disk Drive
#
# lsvg
rootvg
#
# lsvg -p rootvg
rootvg:
PV_NAME           PV STATE          TOTAL PPs   FREE PPs    FREE DISTRIBUTION
hdisk0            active            639         468         127..85..00..128..128
#
# mkvg -y beastievg hdisk1
beastievg
#
# lsvg -p beastievg
beastievg:
PV_NAME           PV STATE          TOTAL PPs   FREE PPs    FREE DISTRIBUTION
hdisk1            active            539         539         108..108..107..108..108
Seems ready to put real stuff here right now. Later, if new disk will be added through the VIOS, simply add the new virtual SCSI disk to the volume group:
# cfgmgr
#
# lsdev | grep hdisk
hdisk0     Available       Virtual SCSI Disk Drive
hdisk1     Available       Virtual SCSI Disk Drive
hdisk2     Available       Virtual SCSI Disk Drive
#
# extendvg beastievg hdisk2
0516-1254 extendvg: Changing the PVID in the ODM.
#
# lsvg -p beastievg
beastievg:
PV_NAME           PV STATE          TOTAL PPs   FREE PPs    FREE DISTRIBUTION
hdisk1            active            539         539         108..108..107..108..108
hdisk2            active            539         539         108..108..107..108..108
Update the operating system to the latest Maintenance Level (e.g. 5.3ML3 at the time of this writing)#
Log in to the NIM server and set the standalone machine configuration
for beastie:
# TERM=vt220 smitty nim
/*
 * Perform NIM Software Installation and Maintenance Tasks
 *  Install and Update Software
 *   Update Installed Software to Latest Level (Update All)
 *    (Choose: "beastie        machines       standalone")
 *    (Choose: "53ML3          resources      lpp_source")
 */
Most of the time, these kind of software changes require the system to be rebooted in order for the changes to be made effective:
# shutdown -r now
Attaching the partition to the general network infrastructure (LDAP, NIS, NFS, DNS, etc.)#
Please consult the following online documentation: Use the NIS and NFS Infrastructure on AIX 5L.
Modify the maximum number of processes allowed per user#
Check for default setting:
# lsattr -D -l sys0 | grep maxuproc
maxuproc        128     Maximum number of PROCESSES allowed per user      True
Then change it accordingly, for example default x 4:
# chdev -l sys0 -a maxuproc=512
sys0 changed
#
# lsattr -El sys0 | grep maxuproc
maxuproc        512                Maximum number of PROCESSES allowed per user      True
Get network time#
Assuming that the clock is given by the default gateway network device, we can set and configure the NTP client this way.
Get the default gateway IP address…
# netstat -rn | grep default
default          10.126.213.1      UG        1     2738  en1     -   -      -
… and hard-set the date using ntpdate(8):
# ntpdate 10.126.213.1
30 Sep 18:04:48 ntpdate[282628]: step time server 10.126.213.1 offset -25063.236234 sec
Then, configure the NTP deamon (xntpd) and start the service:
# cp /etc/ntp.conf /etc/ntp.conf.orig
#
# diff -c /etc/ntp.conf.orig /etc/ntp.conf
*** /etc/ntp.conf.orig  Fri Sep 30 18:05:17 2005
--- /etc/ntp.conf       Fri Sep 30 18:05:43 2005
***************
*** 36,41 ****
  #
  #   Broadcast client, no authentication.
  #
! broadcastclient
  driftfile /etc/ntp.drift
  tracefile /etc/ntp.trace
--- 36,42 ----
  #
  #   Broadcast client, no authentication.
  #
! #broadcastclient
! server 10.126.213.1
  driftfile /etc/ntp.drift
  tracefile /etc/ntp.trace
#
# chrctcp -S -a xntpd
0513-059 The xntpd Subsystem has been started. Subsystem PID is 336032.
After some time, be sure that the system get its time from the network device (verify the * in front of the remote node):
# ntpq -pn
     remote           refid      st t when poll reach   delay   offset    disp
==============================================================================
*10.126.213.1    10.126.192.132   3 u    9   64   37     0.85   13.601  877.12
Install and configure OpenSSH and the administrative tool sshd_adm#
The aim of this part is to have a tuned configuration of OpenSSH for all
clients, and have a specialized configuration for sshd_adm, a second
OpenSSH installation which purpose is to be dedicated to administrators
and administrative tasks.
Install the OpenSSL RPM package provided by the Linux toolbox for AIX:
# mount -n nim -v nfs /export/lpp_source /mnt
# rpm -ivh /mnt/cd_roms/AIX_Toolbox_for_Linux_Applications_for_Power_Systems_11.2004/RPMS/ppc/openssl-0.9.7d-1.aix5.1.ppc.rpm
openssl                     ##################################################
Then, install the OpenSSH RPM packages, found on the IBM web site (e.g.
openssh-3.8.1p1_53.tar.Z for AIX 5.3):
# mkdir /tmp/_sm_inst.$$   /* Put the downloaded package here. */
# zcat /tmp/_sm_inst.$$/openssh-3.8.1p1_`uname -v``uname -r`.tar.Z |  (cd /tmp/_sm_inst.$$ && tar xf -)
# /usr/lib/instl/sm_inst installp_cmd -a -Q -d /tmp/_sm_inst.$$ -f openssh.* -c -N -g -X -G -Y
geninstall -I "a -cgNQqwXY -J"  -Z   -d /tmp/_sm_inst.176290 -f File 2>&1

File:
    I:openssh.base.client          3.8.0.5302
    I:openssh.base.server          3.8.0.5302
    I:openssh.license              3.8.0.5302
    I:openssh.man.en_US            3.8.0.5302
    I:openssh.msg.HU_HU            3.8.0.5302
    I:openssh.msg.RU_RU            3.8.0.5302
    I:openssh.msg.hu_HU            3.8.0.5302
    I:openssh.msg.ru_RU            3.8.0.5302
[...]
Don’t forget to clean things up…
# rm -r /tmp/_sm_inst.$$
# umount /mnt
For the configuration steps of the two deamons, please consult the following online documentation: How to Add a New “sshd_adm” Service on AIX 5L.
Install some useful tools commonly used nowadays#
The tcsh shell#
Log in to the NIM server and set the standalone machine configuration
for beastie:
# TERM=vt220 smitty nim
/*
 * Perform NIM Software Installation and Maintenance Tasks
 *  Install and Update Software
 *   Install Software
 *    (Choose: "beastie        machines       standalone")
 *    (Choose: "AIX_Toolbox_for_Linux     resources       lpp_source")
 *     (Select: "coreutils-5.0                            ALL")
 *     (Select: "grep-2.5.1                               ALL")
 *     (Select: "tcsh-6.11                                ALL")
 */
The zip and unzip utilities#
Log in to the NIM server and set the standalone machine configuration
for beastie:
# TERM=vt220 smitty nim
/*
 * Perform NIM Software Installation and Maintenance Tasks
 *  Install and Update Software
 *   Install Software
 *    (Choose: "beastie        machines       standalone")
 *    (Choose: "AIX_Toolbox_for_Linux     resources       lpp_source")
 *     (Select: "zip-2.3                                  ALL")
 *     (Select: "unzip-5.51                               ALL")
 */
The j2se toolkit#
Install the Java 1.4.2 packages in mode 32-bit and 64-bit, found on the IBM web site:
# mkdir /tmp/_sm_inst.$$   /* Put the downloaded packages here. */
# /usr/lib/instl/sm_inst installp_cmd -a -Q -d /tmp/_sm_inst.$$ -f _all_latest -g -X -G -Y
geninstall -I "agQqwXY -J"  -Z   -d /tmp/_sm_inst.299180 -f File 2>&1

File:
    I:Java14.license               1.4.2.0
    I:Java14.sdk                   1.4.2.4
    I:Java14_64.license            1.4.2.0
    I:Java14_64.sdk                1.4.2.3
[...]
Don’t forget to clean things up…
# rm -r /tmp/_sm_inst.$$
The sudo security program#
Log in to the NIM server and set the standalone machine configuration
for beastie:
# TERM=vt220 smitty nim
/*
 * Perform NIM Software Installation and Maintenance Tasks
 *  Install and Update Software
 *   Install Software
 *    (Choose: "beastie        machines       standalone")
 *    (Choose: "AIX_Toolbox_for_Linux     resources       lpp_source")
 *     (Select: "sudo-1.6.7p5                             ALL")
 */
Don’t forget to add the hostname beastie to the correct list in
the sudoers global site configuration file.
The perl parsing tool#
The perl program was compiled from sources, and is available as a
shared NFS resource for AIX at:
# df -k /Apps/perl
Filesystem    1024-blocks      Free %Used    Iused %Iused Mounted on
XX.XX.XX.XX:/export/nfssrv/apps/AIX/powerpc/64/5.3/perl    35349504  32800724    8%     7885     1% /Apps/perl
#
# /Apps/perl/5.8.7/bin/perl -v

This is perl, v5.8.7 built for aix
The Unix administrative tool lsof (LiSt Open Files)#
Log in to the NIM server and set the standalone machine configuration
for beastie:
# TERM=vt220 smitty nim
/*
 * Perform NIM Software Installation and Maintenance Tasks
 *  Install and Update Software
 *   Install Software
 *    (Choose: "beastie        machines       standalone")
 *    (Choose: "AIX_Toolbox_for_Linux     resources       lpp_source")
 *     (Select: "lsof-4.61                                ALL")
 */
Configure the OS to boot via a SAN disk (thanks to the VIOS)#
So, the operating system is now at the required ML (e.g. 5.3ML3) to support a SAN boot disk via the VIOS. Assuming that all the steps to make available this disk to the VIOC are already done, here is how to fully put this partition onto the SAN.
Information about the corresponding SAN disk provided through the VIOS:
# lscfg -v -l hdisk3
  hdisk3           U9113.550.65E3A0C-V8-C11-T1-L840000000000  Virtual SCSI Disk Drive
Try to put it in the rootvg system volume group:
# extendvg rootvg hdisk3
0516-1254 extendvg: Changing the PVID in the ODM.
0516-1162 extendvg: The Physical Partition Size of 16 requires the creation of
        1078 partitions for hdisk3.  The limitation for volume group rootvg is
        1016 physical partitions per physical volume.  Use chvg command with -t
        option to attempt to change the maximum Physical Partitions per Physical
        volume for this volume group.
0516-792 extendvg: Unable to extend volume group.
As shown, a limitation was reached, especially because of the current
settings of the rootvg system volume group. In fact, it is due to the
original size of the virtual disk hosting the system file systems… and
so the size of the corresponding logical volume on the VIOS,
beastielv. Change the rootvg charateristic as proposed and extend
the volume group one more time:
# chvg -t 2 rootvg
0516-1193 chvg: WARNING, once this operation is completed, volume group rootvg
        cannot be imported into AIX 430 or lower versions. Continue (y/n) ?
y
0516-1164 chvg: Volume group rootvg changed.  With given characteristics rootvg
        can include upto 16 physical volumes with 2032 physical partitions each.
#
# extendvg rootvg hdisk3
The next step is to evacuate the content of hdisk0 (logical volume
via a virtual SCSI disk) to hdisk3 (dedicated SAN disk via a virtual
SCSI disk):
# migratepv hdisk0 hdisk3
0516-1011 migratepv: Logical volume hd5 is labeled as a boot logical volume.
0516-1246 migratepv: If hd5 is the boot logical volume, please run 'chpv -c hdisk0'
        as root user to clear the boot record and avoid a potential boot
        off an old boot image that may reside on the disk from which this
        logical volume is moved/removed.
migratepv: boot logical volume hd5 migrated. Please remember to run
        bosboot, specifying /dev/hdisk3 as the target physical boot device.
        Also, run bootlist command to modify bootlist to include /dev/hdisk3.
As explain by the command migratepv, modifiy some boot settings is
necessary here and can’t be avoided. Clear the boot record on the
`old’ system disk:
# chpv -c hdisk0
Verify and create a boot image on the newly system disk:
# bosboot -vd hdisk3 && bosboot -ad hdisk3

bosboot: Boot image is 23320 512 byte blocks.
Alter the device boot list to include (new) and remove (old) disks:
# bootlist -m normal -o
hdisk0
# bootlist -m normal hdisk3
# bootlist -m normal -o
hdisk3
#
# ls -ilF /dev/ipldevice /dev/rhdisk3
 1727 crw-------   2 root     system       17,  3 Oct  4 13:01 /dev/ipldevice
 1727 crw-------   2 root     system       17,  3 Oct  4 13:01 /dev/rhdisk3
We are done with this by now. Just clean rootvg, remove hdisk0 and
restart the partition:
# reducevg rootvg hdisk0
#
# rmdev -l hdisk0 -Rd
hdisk0 deleted
#
# shutdown -r now
Last, clean the VIOS virtual adapter configuratrion for the partition…
$ rmdev -dev vtscsi16
vtscsi16 deleted
$
$ lsmap -vadapter vhost6
SVSA            Physloc                                      Client Partition ID
--------------- -------------------------------------------- ------------------
vhost6          U9113.550.65E3A0C-V3-C11                     0x00000008

VTD                   vtscsi17
LUN                   0x8200000000000000
Backing device        hdisk15
Physloc               U787B.001.DNW3897-P1-C4-T1-W5006048448930A41-L2000000000000

VTD                   vtscsi18
LUN                   0x8300000000000000
Backing device        hdisk16
Physloc               U787B.001.DNW3897-P1-C4-T1-W5006048448930A41-L3000000000000

VTD                   vtscsi19
LUN                   0x8400000000000000
Backing device        hdisk23
Physloc               U787B.001.DNW3897-P1-C4-T1-W5006048448930A41-L12000000000000

VTD                   vtscsi20
LUN                   0x8500000000000000
Backing device        hdisk24
Physloc               U787B.001.DNW3897-P1-C4-T1-W5006048448930A41-L13000000000000
… and remove the corresponding logical volume:
$ rmlv beastielv
Warning, all data contained on logical volume beastielv will be destroyed.
rmlv: Do you wish to continue? y(es) n(o)? y
rmlv: Logical volume beastielv is removed.
Resize the /tmp file system and the swap space logical volume#
Because the operating system was installed from scratch and the file system sizes were automatically adapted to the underlying SCSI virtual disk (in fact a logical volume provided by the VIOS on a locally attached SCSI disk), some default values may not be relevant for day to day use, especially on machine of server type.
In that sense, the size of the /tmp file system may be changed to a
more sensible setting:
# df -k /tmp
Filesystem    1024-blocks      Free %Used    Iused %Iused Mounted on
/dev/hd3            32768     32388    2%       10     1% /tmp
#
# chfs -a size=1024M /tmp
Filesystem size changed to 2097152
#
# df -k /tmp
Filesystem    1024-blocks      Free %Used    Iused %Iused Mounted on
/dev/hd3          1048576   1048044    1%       10     1% /tmp
In the same time, the swap space may be enlarge to grow the available VM on the system:
# lsps -al
hd6
#
# lsps -as
Total Paging Space   Percent Used
      512MB               1%
#
# lsvg rootvg | grep "PP SIZE"
VG STATE:           active                   PP SIZE:        16 megabyte(s)
#
# echo "(2048-512)/16" | bc
96
#
# chps -s 96 -a y hd6
#
# lsps -as
Total Paging Space   Percent Used
      2048MB               1%
Install and configure the backup software tool (TSM)#
Please consult the following documentation: How to Add a New “tsmsched” Service on AIX 5L.
Put this machine under the ldm management tool#
Don’t forget to add the new machine in the ldm local site utility in
order to be able to manage it and obtain some useful information get on
a daily basis.
# ldmadd beastie

TESTING beastie REMOTE ACCESS ...
sysadm: access denied on beastie ...
Configuring sysadm's ssh authorized_keys file ... beastie done.

Checking some prerequisites on beastie ...
ok

Updating ldm agent files on beastie ...
[...]